Building this Ubuntu-based multi-window manager/ DE environment is tested on Peppermint OS 10. The steps highlighted should work with other Ubuntu-based distros & with minor tweaks should even work on Arch based distros. What I can say is that they work on mine.
For those who have under powered, arcane laptops such as my Acer Aspire One A0722, I am sharing my recent foray into using Peppermint OS 10.
Peppermint OS 10 (P10), if you are unfamiliar, offers a blended Desktop Environment (DE) build largely of xfce4, lxde, and cinnamon DE components. The environment discussed in this tutorial runs on a tweaked (modified) Ubuntu Bionic LTS (Long Term Support) base, such as Peppermint OS 10.
![]() I have to say the base (basic) P10 environment is quite nice. It runs smoothly and consumes few resources. Out of the box, P10 idles at about 500MB on my machine. Because I am never satisfied with vanilla installs, I elected to tweak my initial installation to see what I could achieve with minor efforts. Just by shutting down a number of background daemons and services, I was able to get the desktop to about 350MB (at idle with one terminal window running). Having achieved that, I decided I’d work on my teeny, tiny platform to see what diversity and performance I might attain (with a modicum of effort).
I have to say the base (basic) P10 environment is quite nice. It runs smoothly and consumes few resources. Out of the box, P10 idles at about 500MB on my machine. Because I am never satisfied with vanilla installs, I elected to tweak my initial installation to see what I could achieve with minor efforts. Just by shutting down a number of background daemons and services, I was able to get the desktop to about 350MB (at idle with one terminal window running). Having achieved that, I decided I’d work on my teeny, tiny platform to see what diversity and performance I might attain (with a modicum of effort).
Here are images of my desktops after all the tasks listed below were accomplished:
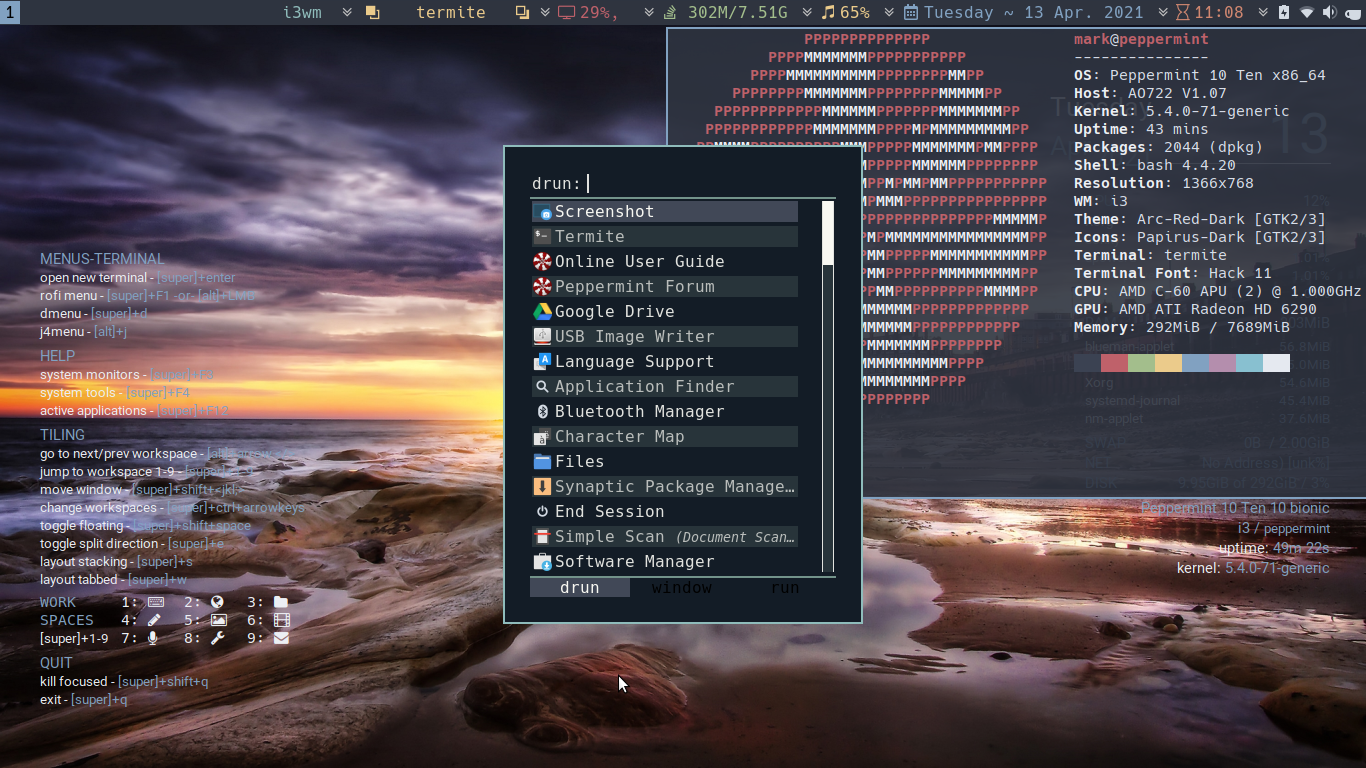
Peppermint OS 10 @ 349MB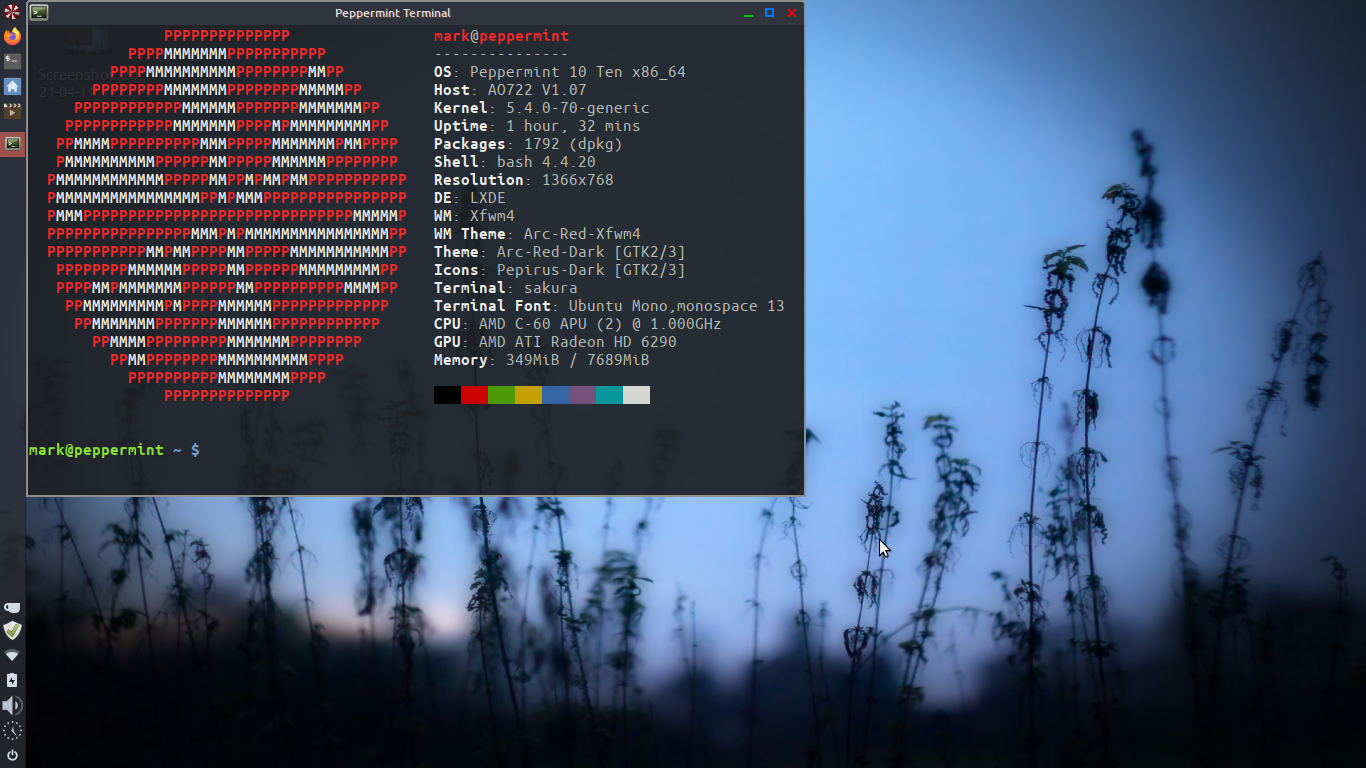 i3wm on Peppermint OS @ 292MB
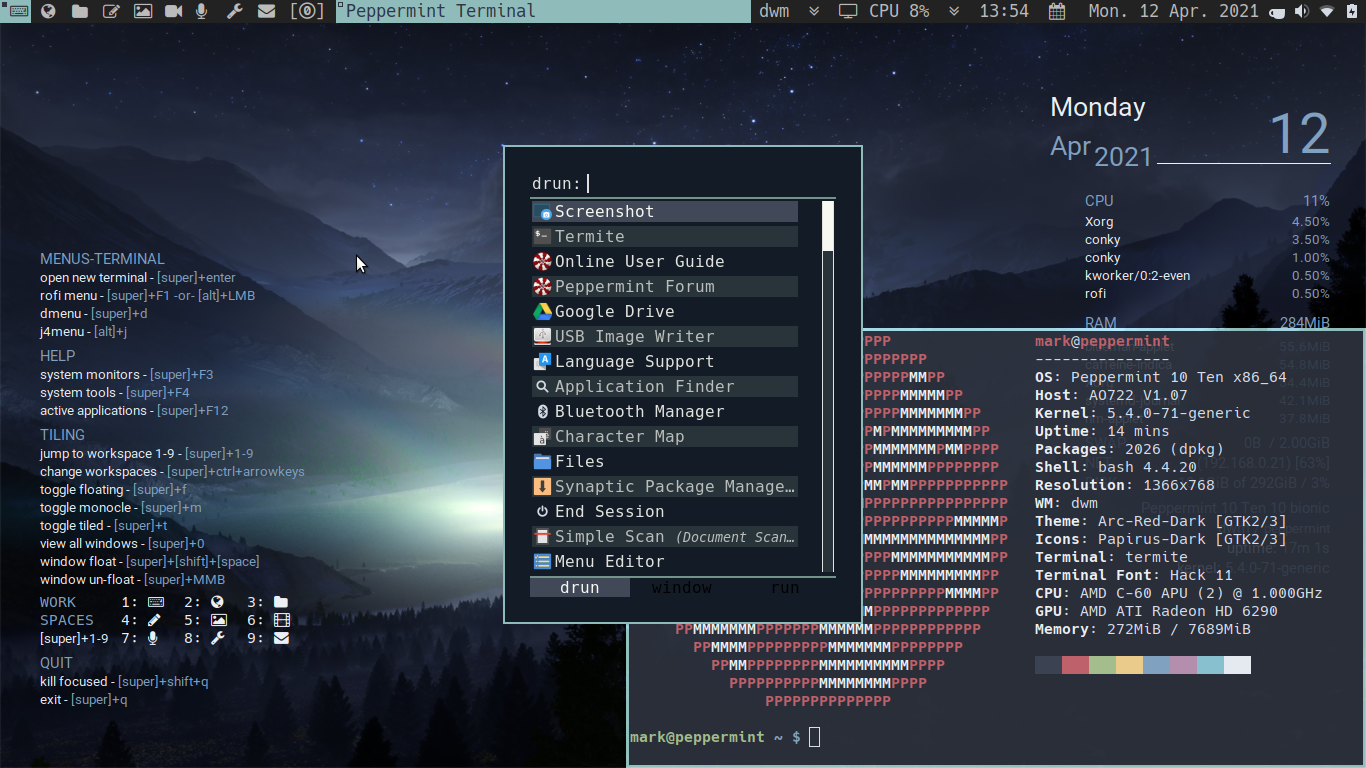
 dwm on Peppermint OS @ 272MB
Use-case
Here’s what I set out to achieve:
- No degradation in performance on the basic Peppermint 10 Desktop Environment (DE).
- The addition of dwm (from suckless) to my user desktop account.
- Addition of i3wm (not the gaps version) to the user desktop.
- Shared x window services across all three desktops.
- Shared Keybindings (application short-cuts) across all three desktops (P10, i3wm, dwm).
- Blazing (okay, leisurely but not ponderous) speed in each environment.
Key Software Components
The new software components I added to P10 to build essential functions for this environment include:
- sxhkd (for sharing keybindings)
- rofi (for common/shared menus, application searching, and active application monitoring and access)
- feh is used to load new desktop wallpapers when a new desktop is opened. I continue to use nitrogen (which is native to Peppermint) for wallpaper changing.
- dunst is used as my common notification software. It is lighter than notifyd and more fun to tweak.
- yad & zenity scripts
- .xsessionrc is incorporated into the user area/ login process in order to set x-windows functions in a standard manner for each desktop (when activated).
- conky & conkybar for desktop status monitoring on i3 and dwm.
Added (New) Functionality
Additional ‘neat features ‘(so say I) incorporated in the ‘new’ environment include:
- caffeine- this little app does burn a little extra memory, but it keeps my desktop from timing out when I don’t want it to, like during long compiles, videos, podcasts, etc.
- termite- because it is my current favorite terminal (although I have to say that Sakura terminal, the native P10 terminal, is fine). Adding termite is probably more of a chore than most Debian/Ubuntu users want to undertake because it needs to be built from source. Here is the link I used. You are welcome to give it a go. If you want to do this, here is what I used/followed (source):
wget https://raw.githubusercontent.com/Corwind/termite-install/master/termite-install.sh
chmod +x ./termite-install.sh
./termite-install.sh
sudo update-alternatives --config x-terminal-emulator
- xautolock & i3lock-fancy are used to replace the heavier screenlock and light-locker found on the base version of Peppermint OS 10.
- powertop, thermald, and tlp for power conservation.
In order to build this ‘brave new environment’, I have had to strip almost all Peppermint startup (autostart) functions and incorporate them into .xsessionrc (Note: If you are using an Arch-base distro you should rename this file to .xprofile). I, also, have removed all Peppermint keybindings from within Peppermint and moved them to sxhkd (so they will work with every desktop environment). You should leave any unique to Peppermint x-window functions and/or keybindings where they are in their native Peppermint setup. To be honest I have very few items remaining in their native locations.
Note: Be careful here…. There be monsters, should you err.
Included below are the various files I created and use (you may use and/or alter these to suit your preferences). Be advised that all the dwm and i3 settings are included in the various files below.
You should review and load these files in bulk (once they are adjusted to your satisfaction). The folders I provide you are set up such that they will fit into a non-modified $Home directory. (see Mass Copy Phase- below)
Mass Copy Phase
- Move Peppermint functions from their native Peppermint locations to .xsessionrc (for x-windows functions) and to sxhkd (for application keybindings/short-cuts). The dotfiles I have provided below contain the transitioned versions of “my” Peppermint standard settings. You are on your own to manage yours. If you really, really want, I’ll do yours for you providing you send me your PC (along with return postage) and provide me with a $250 Paypal payment. 😉
- Before executing the “Mass Copy” step (below) please review the entirety but focus especially on the contents of .xsessionrc and .config/sxhkd/base.conf. Be certain you have reviewed the contents of these files and matched them against what you removed (or will remove) from your P10 autostart function. Examine my templates, use them, learn from them. This is really not too very difficult. Remember, these files will play a crucial role in making certain your previous setup continues to work as intended, and that the new environment will blend seamlessly into your setup and match your setup where ever possible.
- As you examine & review the entirety of the folder contents (link below) you will notice folders containing additional information like fonts, themes, etc. These are used in both i3 and dwm. You don’t need to do anything more than keep them and include them in the “Mass Copy”. If you don’t keep them then numerous items in i3 and dwm will break. You’ve been warned.
- “Mass Copy” step: If you are good to go with standard file folder layout in your $Home directory and have completed the content review, it should be okay to over-write things should you encounter duplicate file names. You should now be ready to drag & drop them (the lot) into your $Home.
- Next, using synaptic install caffeine, rofi, sxhkd, dunst, yad, feh, xautolock, i3lock-fancy,thermald, tlp, powertop, and zenity. Don’t worry if synaptic tells you that an application is already installed, plod on through by re-installing those items (no harm, no foul).
Mass Copy Folder for download (zipped)- about 280MB
Once you have completed the above steps, you can log out and log back in to P10. You should note no change in Peppermint after login. (Note: Test this to be certain.) Everything should work like it did before, assuming you didn’t lose something in the autostart/ keybinding transition.
At the end of this phase, you should still have a functioning P10 environment, although a bunch of ‘stuff’ will have been moved to new autostart and ‘xwindow function’ locations.
When you are ready to add either i3wm and/or dwm I recommend you make the transition(s) in step-wise fashion (see below).
i3 Phase (optional)
![]()
- Now you are at the point where you are ready to install i3. I used synaptic for this function. I installed the i3 meta package. This step should be pretty simple. After i3 is installed, use synaptic to install conky-all.
- Before logging out of your P10 desktop, make certain your $Home/.config/i3 directory is populated (if you did not remove items from the “Mass Copy” above you should see ‘stuff’ in your $Home/.config/i3 folder. If that folder is empty, or missing items, you will need to copy the .config/i3 folder again. You will find the base mterials in the Mass Copy master folder.
- Once you make certain i3 and conky-all are installed and your $Home/.config/i3 folder is populated, you should be able to log out of Peppermint and on the Login screen see an option for i3. Select the i3 option and Login… voilá. You should have an i3 desktop. The conkies left & right should help you with getting in & out & around. To learn about how i3 works, visit their site. Enjoy. (N.B. Read the Mass Copy folder .config/sxhkd/base.conf to review the application bindings I provided (plus your changes). You will, also, find the details of how i3 works in the same Mass Copy folder in .config/i3.conf -the i3 configuration file.)
dwm Phase (optional)

If you really want to be among the cool-kids, this third desktop installation phase is for you.
Setting up dwm is really pretty simple. If you downloaded all the files from the “Mass Copy” folder, you will have all the essential dwm software. You will find your files located in $Home/.local/bin You just need to compile it.
Do NOT install dwm from a repo. dwm is not designed to be installed that way… sorry.
Here’s what you need to do to get things operational (be aware you will get things setup my way. Down the road you will want to tweak things to your fancy/ needs.
For Debian based distros (like ubuntu), using your terminal to install numerous dependencies. (reference: https://johnjago.com/blog/dwm/):
sudo apt install make gcc libx11-dev libxft-dev libxinerama-dev xorg libharfbuzz-dev
Next go to the main dwm sub-folder ($Home/.local/bin/dwm/dwm) and open a terminal in that directory. Enter the following command:
sudo make clean install
Then got to the slstatus sub-folder ($Home/.local/bin/dwm/slstatus) and open a terminal in that directory.
Enter the following command:
sudo make clean install
The first step in the dwm setup only needs to be run one time. Because I have made numerous edits to config.h for your base install, you don’t actually need to edit config.h unless you really, really want to. If you have never played with dwm before, don’t do too much futzing with things before you do some research. You have been warned!
Next in order to get dwm to appear as an option on your login display manager, we have another small task to perform.
- We need to create an xsession file for dwm.
- What we are going to do is edit the pre-existing i3.desktop file, and then save it under another name so we will be able to open dwm as LightDM (Slick Greeter) option.
- In a terminal window enter:
sudo geany /usr/share/xsessions/i3.desktop
Replace the existing i3.desktop info with the following; make certain <UserName> = your username :
[Desktop Entry] Name=dwm
Comment=dynamic window manager
Exec= /home/<UserName>;/.local/bin/autostart-scripts/start-dwm.sh
Type=Application
Icon=preferences-system-windows-move
Save the revised file as: dwm.desktop
(Be certain to rename the edited i3.desktop file and leave the original i3.desktop file as it was.). The Exec=$Home/.local/bin/autostart-scripts/start-dwm.sh provides dwm unique autostart functions as well as the actual dwm executable call.
Once you have completed these steps, you should be able to open all the installed window managers plus your original desktop, as you need/ want them.
Enjoy!
This content is free to use, adapt, and share. Knowledge and information should be open
—please spread them far and wide. ~ All materials licensed: CC BY-ND 4.0
Full disclosure:
All content is based on information from publicly available sources. No classified or speculative information is used.
I do not track or sell any user information or use patterns.
This site uses Machine-Intelligence (aka. AI) to assist in content development and maintenance. See: Ardens AI-Powered Research with a Human Compass
Please keep in mind:
- All of my work comes with absolutely no warranty, expressed or implied. However…
- It will almost certainly work until it breaks,
though I must admit it may never work or be useful—and that would be sad.- If/when it breaks, you can keep all the pieces.
- As for what you don’t like, it’s yours to do with as you will.
- If you find my materials helpful, both you and I will be happy (at least for a while).
- My advice is worth every penny you paid for it!