- Are you interested in learning a bit ‘more’ about Linux Window Managers?
- Have you tried installing one (or more) only to arrive at a blank screen?
- Do you aspire to join the LinuxMasterRace and rice your own desktop? ~Do you want to be one of the cool kids on the Linux block?
Well, if I haven’t already lost your interest, here’s what I have developed “for you”. I have built a Linux window manager ‘tutorial’. What you will find available here for your use & learning is very much the arrangement I have running on my laptop.
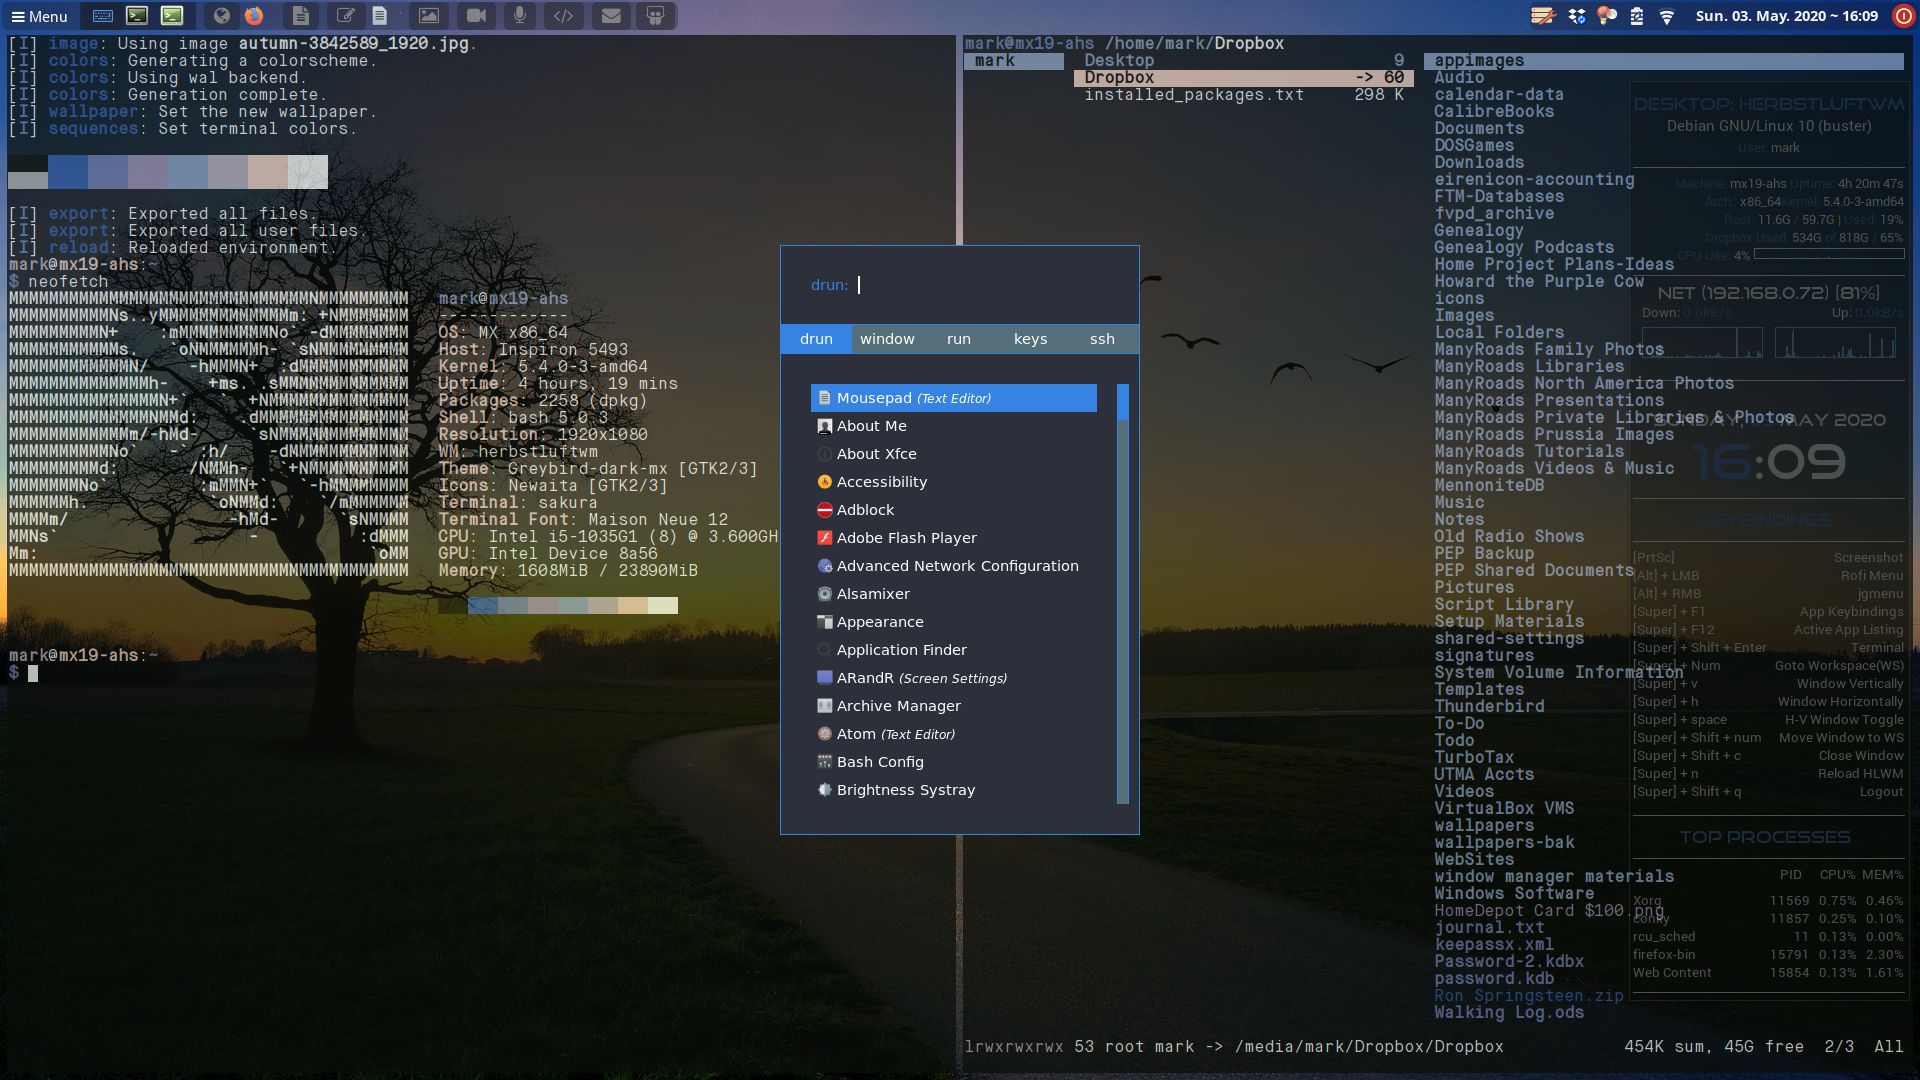
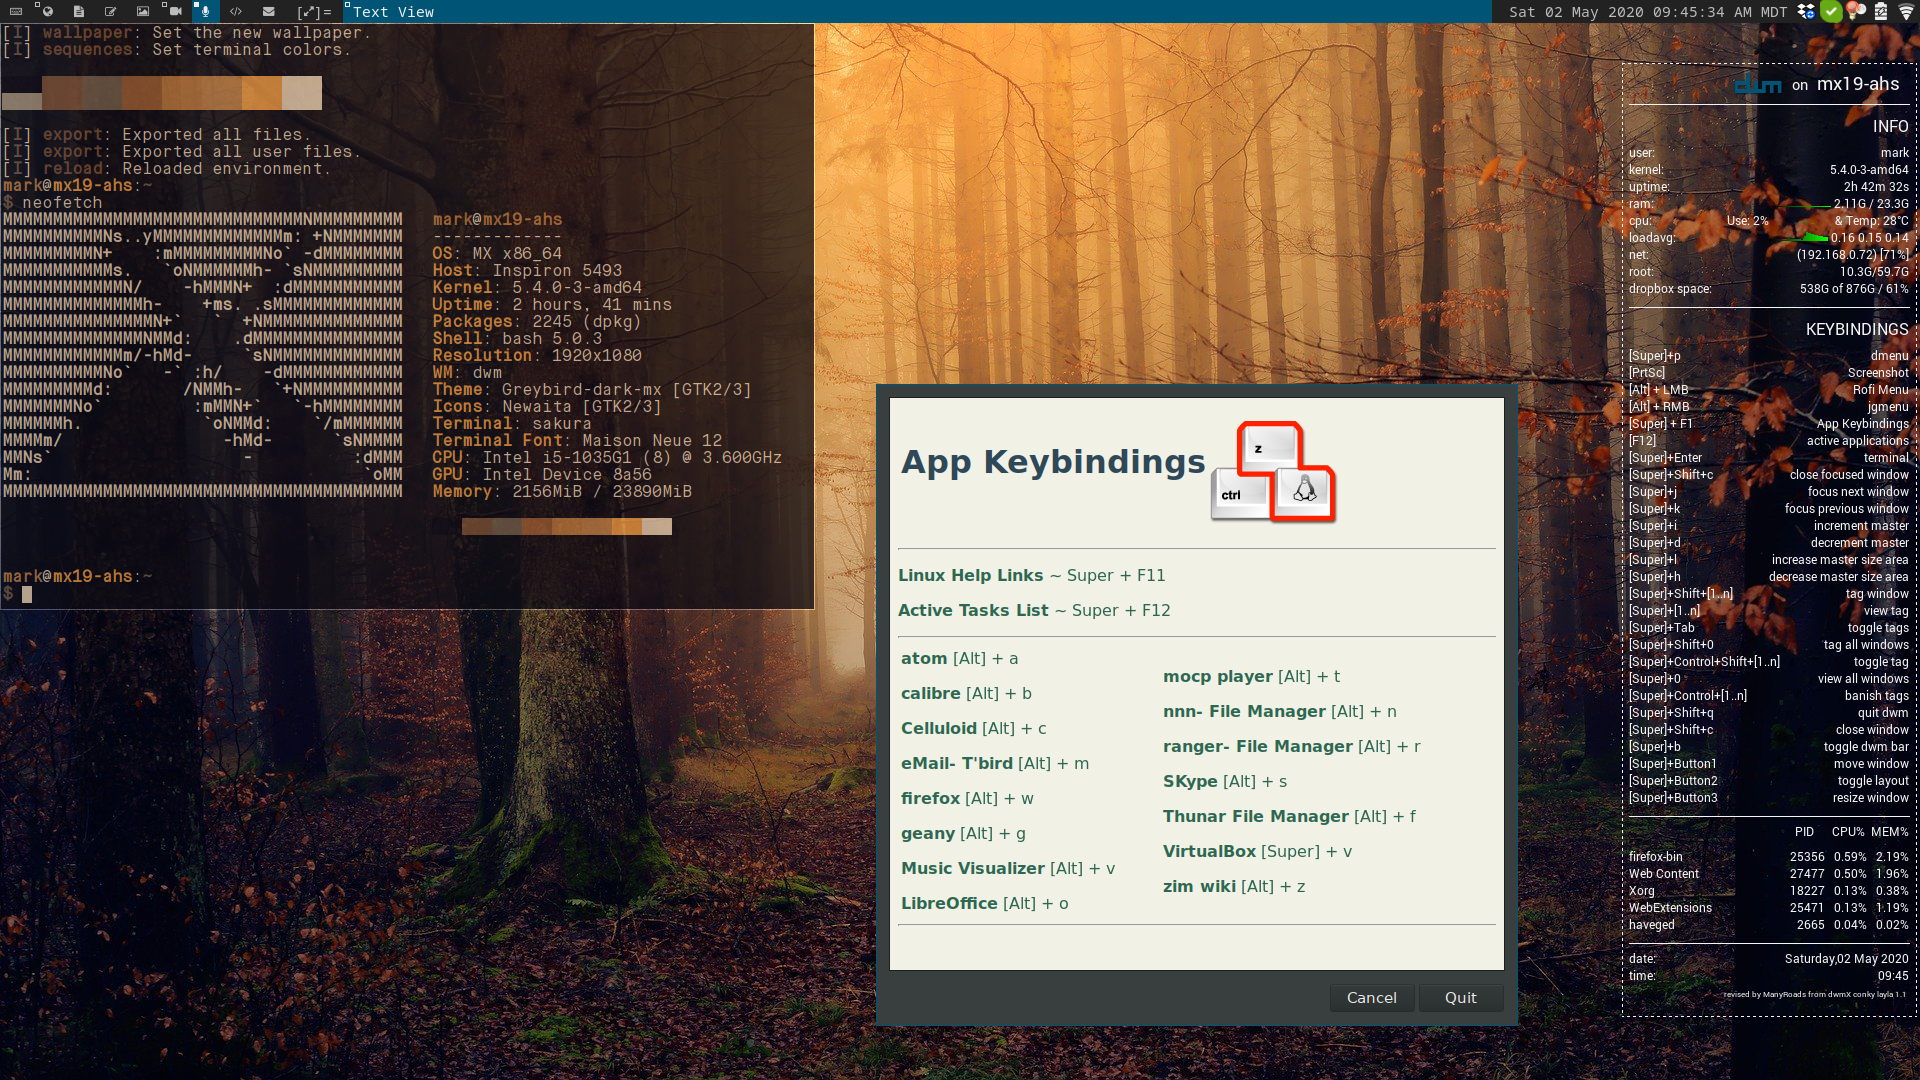
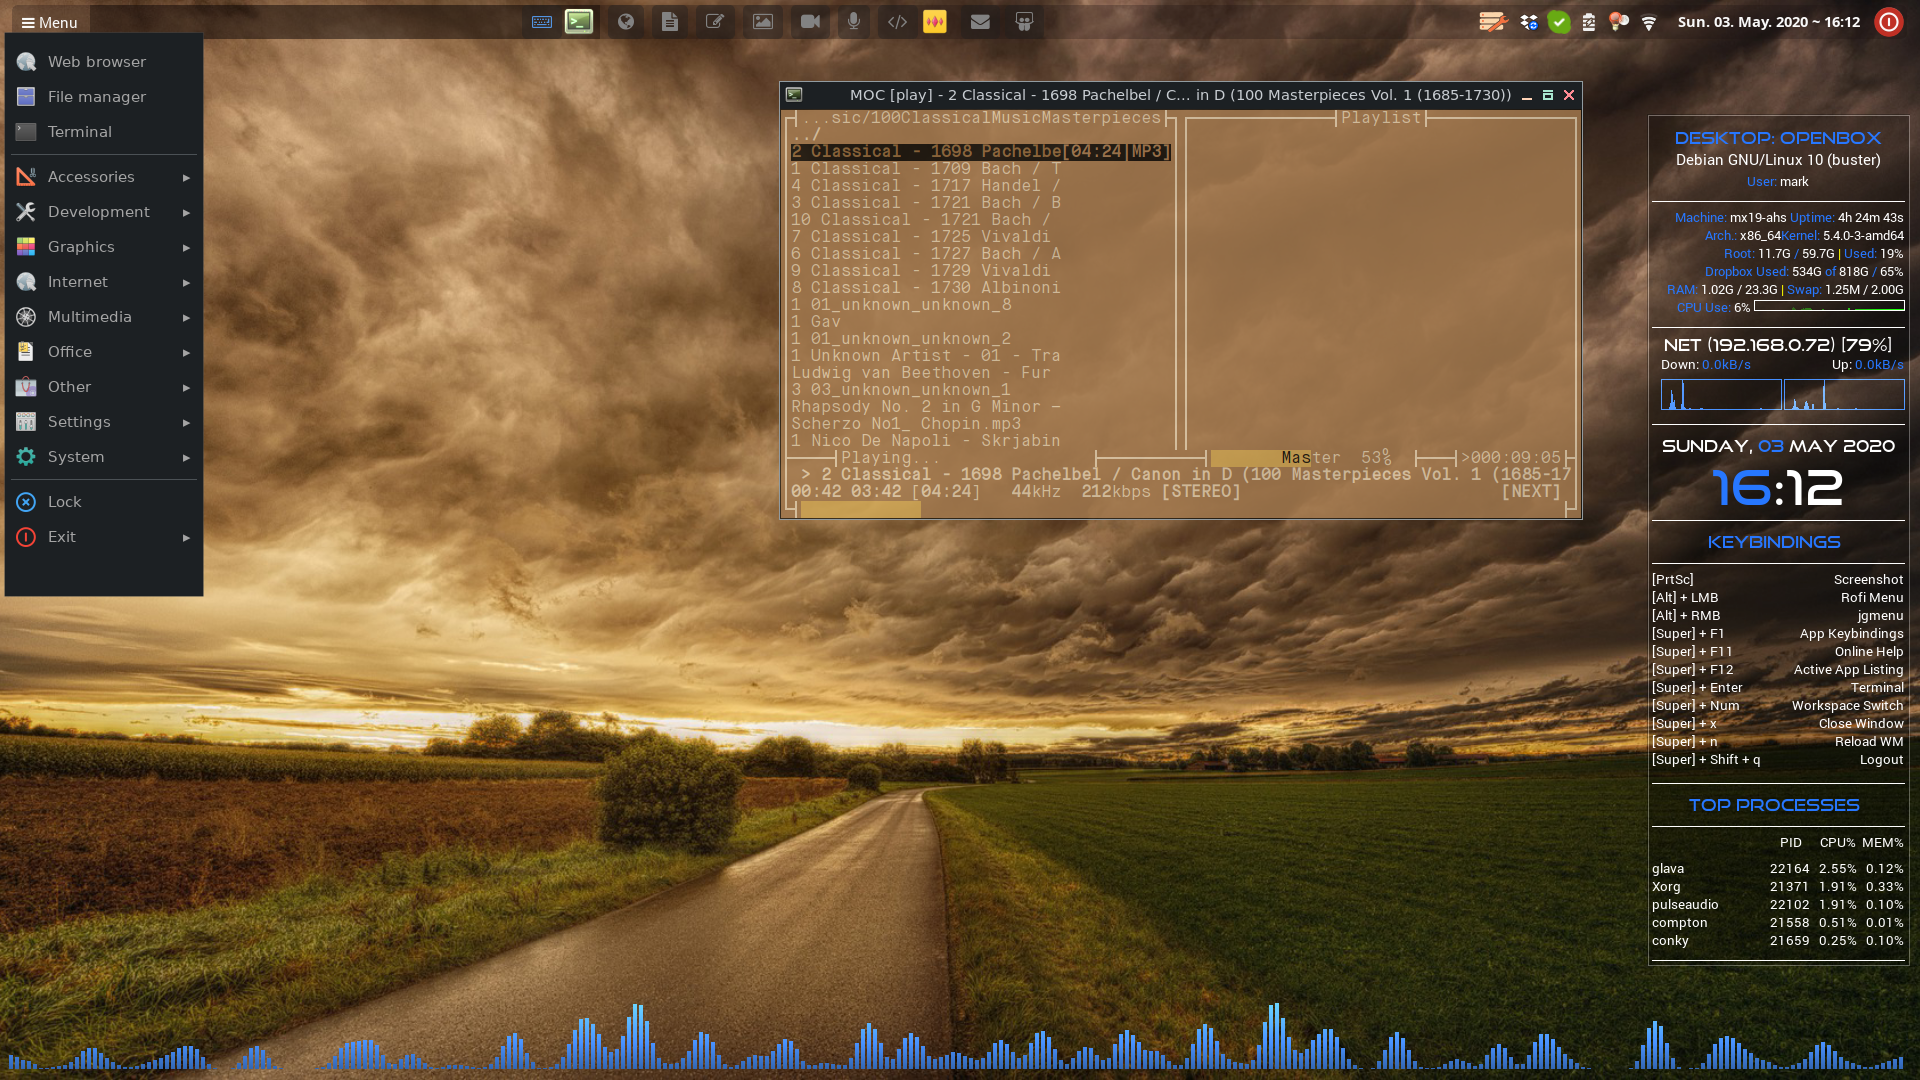
Here are a few screenshots for you to view…

I should note the following regarding this setup:
- The materials, guidance, etc. are free and ready for you to play with. I really do not intend to make this environment more polished than it is; that’s for you to do. I use it in exactly the manner provided. However, I am a perpetual tweaker, I think you should be, too.
- This tutorial will (with any luck) function as an effective guide for building an innovative window manager environment for you to use.
- What I provide here is a set of learning tools for you to work with at your own pace; break it as you please.
- I do not intend to support this tool set as a distro. It is true, this is neither going to be a respin nor a distro.
- If you are wise, you will not use this in a production environment, until you feel it is completely stable and suits your needs. Remember! I told you NOT to use this ‘as-is’ in a production environment; first, make it work for you, then use it for real work!
As you proceed through this tutorial, you should explore things. Ultimately you should endeavor to make this your own. Spend some ‘quality time’ to learn more about:
- dotfiles. You have a bunch here, find them, examine them, work with them.
- Conf files, especially config.h in dwm, learn how it is used; tweak, edit, compile it. Even I can do it. I’m sure you can, too.
- rc files like dunstrc, sxhkdrc- review them, tweak them.
- autostart files and scripts
- tint2 has its own gui editor, find it and learn how-to use it to make panels that better suit you.
- conky- edit, tweak, customize
So what is it our little ‘kit bag’?
Out of the box, this setup offers:
- dotfiles for:
- OpenBox- a stacking Window Manger of great fame.
- bspwm- a tiling window manager that is my current favorite.
- herbsluftwm (hlwm)- another of my favorite tilers
- dwm (dynamic window manager)- considered by many as the ultimate in minimalism (it is only 2,000 lines of code).
The included desktops operate using:
- shared/common keybindings (across some 85% of their functions); these are managed/shared/controlled via sxhkd
- shared/common autostart functions via .xsessionrc (for Debian based distros) & .xprofile (for arch-based distros)
- unique autostart functions, for specific window manager tools, where unique capabilities are required
- bspwm, OpenBox, hlwm dotfiles for tint2 panels/ task bars
- dwm & xfce use their native panels/ task bars
- sakura as the common, standard terminal
- thunar is the standard file manager
- ranger and nnn are available for those wanting to explore console (terminal) base file managers
- mocp is available as a console (terminal based) music player
- pywal is used to change wallpapers and color schemes (you may tweak pywal, as well)
- conky provides desktop information on PC performance; edit and modify it to your needs
- rofi via alt+LMB (left mouse button) provides all window managers (not xfce) desktops with a menu; rofi is also ‘tweakable’
- jgmenu via alt+RMB (right mouse button) also provides all window manager desktops with a menu; jgmenu may be altered, as well
- Super (Win) + F1 provides a popup with Application Keybindings
- Super (Win) + F11 provides a popup with Online Linux Support links
- Super (Win) + F12 provides a popup with a listing of all active applications and their relevant workspace
- dunst is used for most notifications; like pretty much everything else you may adjust this tool, also
- Glava is provided as a Music Visualizer that integrates with most of the environments (it works but is clunky with dwm)
So now what?
This tutorial assumes you will build the entire environment yourself. I have written the guidance & instructions assuming you are using MX Linux 19 as your base distro, although you may freely use another distro. I will attempt to highlight the major differences between a Debian install and arch-base distros. If you choose something other than an arch or Debian based distro, you will need to make the necessary translations yourself.
Setting things up:
Select a distro for use… install your chosen distro per normal procedure(s). I recommend you select a distro featuring xfce as the primary desktop, because we’ll use a number of xfce tools in the ultimate implementation of our window managers. Install the distro making certain it uses bash not zsh or anything else. It does not matter whether or not systemd is present. I, also, recommend you use LightDM as your display manager (my guidance assumes the use of LightDM. If you choose something else, you are on your own. Sorry).
On MX Linux, I remove the following applications, there is no requirement or need to remove these, unless you want to:
sudo apt remove compton fluxbox orage* swell-foop vlc* xfburn featherpad hexchat clipit lbreakout2 mahjongg peg-e clementine note* nomacs gnome-ppp asunder* pppoeconf
If you are seeking an easy to install, thinly configured, arch-based, xfce desktop, I recommend ArchLabs and/or EndeavourOS. Either ought to work well.
Once you have built your basic xfce Desktop setup, we are ready to begin.
Software installs
To start, I recommend you install pywal, a magical screen changer and desktop color tweaker.
- pywal (install on Debian):
sudo apt purge python3-pip && sudo apt install --install-recommends python3-pip && pip3 install pywal - pywal (install on arch):
This is generally available from community repos as: python-pywal
Note: I recommend you perform as many application/ window manager installs as possible via cli, in order to speed up your installation effort. If you use Debian, be advised you want to end up with current not antique applications. You will note that I use a lot of testrepo software from MX.
In the Debian world you can use the following cli (followed by your application list).
# sudo apt install <list of app names separated by a space>
In the arch arena use:
# sudo pacman -S <list of app names separated by a space>
Applications to be installed/ used include the listing below. Some of the Debian app names vary from those provided below on arch based distros; you’ll need to check which fail on install, the same holds true for non-MX Debian based distros.
Easily installed via cli on MX are (you may do a similar install on arch based distros via pacman):
sudo apt install cheese conky-manager conky dunst feh filezilla galculator geany gimp grub-customizer htop keepassx libreoffice light-locker lxappearance mintstick moc mousepad neofetch nnn obconf openbox powertop ranger redshift rofi sakura sxiv thefuck thermald thunderbird tint2 tlp touchpad-indicator zenity zim
On MX Linux, the following are best installed via MXPI (Popular Applications); note that calibre, dropbox, skype, and virtualbox are much easier to install and setup on MXLinux than most anywhere else. These are key apps for me… although, you don’t need to use them for this exercise. (In arch you may wish to install and use pamac-gtk.)
- atom
- calibre
- dropbox
- skype
- virtualbox
The following are best installed via MXPI (MX Test Repo) on MX Linux (These are available via pamac-gtk or pacman or yay on arch.):
- bspwm
- celluloid
- glava (coming soon to the testrepos)
- herbstluftwm
- sxhkd
Install the following via gdebi-gtk (I provide these in the dotfile download folder):
- jgmenu
- obmenu-generator
- picom (but you will need to remove compton first); and be aware that picom can cause difficulties with the newest version of hlwm; so you may wish to keep compton for now.
Installing/ using the dotfiles
Once you have the application base installed and ready, the next step is to copy the dotfiles to their correct/appropriate locations.
This is the same in both the arch & MX Debian worlds.
Assuming you have installed all the apps (or a subset thereof) BACK UP your system (using timeshift or similar). If you have trimmed the list, you probably don’t need all the dotfiles (you are on your own to figure that out).
Here are the downloadable files (Be aware this download is about 250MB)
Once you have downloaded the files, decompress the archive and make certain you are able to view the hidden (dot) files. You can do that via ctrl-h. Drag & drop the files and folders to your $Home directories. The following directories in your $Home area will be either created or over-written. Approve all over-write (creation) requests.
- .config
- .conky
- .local
- .fonts
- .icons
- .bashrc
- .face
- .fehbg
- .profile
- .xprofile
- .Xresources
- .xsession
- .xsessionrc
Next, copy the following from your downloaded folders.
- User-share/* content gets copied to your File System /usr/share/*
- You will need to do the above using sudo or root privs.
- Be aware that the contents of .xsessionrc & .xprofile need to be basically the same because arch uses .xprofile and Debian uses .xsessionrc (The versions you have downloaded work fine on both distro bases for me; I hope they will work for you. You only need to keep the one required for your distro.)
Once all the files & folders are in your $Home directory and in the /usr/share directories, I recommend you reboot your system to make certain things work.
After the reboot completes, you should return to the LightDM Login screen. Options for logging in to xfce, herbstluftwm, bspwm, openbox should be available. Note: Be certain you know how-to use LightDM, if you don’t already.
If you are not an expert LightDM user and you find multiple desktop choices missing, something is amiss. If you don’t know what went wrong or how-to fix it, I recommend restarting the process from the beginning to see if you made a teenie, tiny error.
Once you successfully Login to xfce, we will begin another small adventure- installing dwm. Because almost everything for dwm is pre-setup for you, all you really need to do is as follows:
- Goto to $Home/.local/bin/dwm/dwm-6.2/ and open a terminal window from WITHIN the /dwm-6.2 folder.
Given this is the first (initial) install of dwm, you have one extra step from a normal dwm update.
For a MX Debian Install (reference: https://johnjago.com/blog/dwm/):
# sudo apt install make gcc libx11-dev libxft-dev libxinerama-dev xorg libharfbuzz-dev
sudo make clean install
Arch Install dwm (reference: https://savemyday.dk/blog/dwm-a-window-manager/)
# sudo pacman -S xorg xorg-xinit
sudo make clean install
The first step in the dwm setup only needs to be run one time. Because I have made numerous edits to config.h for your base install, you don’t actually need to edit config.h… unless you really, really want to. If you have never played with dwm before, don’t do too much futzing with things before you do some research. You have been warned!
Next in order to get dwm to appear as an option on LightDM, we have another small task to perform.
- We need to create an xsession file for dwm.
- What we are going to do is edit the pre-existing bspwm.desktop file, and then save it under another name so we will be able to open dwm as LightDM option.
- In a terminal window enter:
# sudo geany /usr/share/xsessions/bspwm.desktop
Replace the existing bspwm info with the following; make certain <UserName> = your username :
[Desktop Entry]
Name=dwm

Comment=dynamic window manager

Exec= /home/<UserName>/.local/bin/autostart-scripts/start-dwm.sh

Type=Application

Icon=preferences-system-windows-move
Save the revised file as: dwm.desktop
(Be certain to rename the edited bspwm.desktop file and leave the original bspwm.desktop file as it was.). The Exec=$Home/.local/bin/autostart-scripts/start-dwm.sh provides dwm unique autostart functions as well as the actual dwm executable call.
Once you have completed these steps, you should be able to open all the installed window managers plus xfce, as you need/ want them.
Additional notes (Remember: Xfce is NOT a Window Manager, it is a Desktop Environment -DE.):
- xfce keybindings are not completed until you do them manually following the traditional xfce keyboard command setup. I did not do them for you.
- Alt + LMB (Left Mouse Button) should provide a Rofi menu on any installed Window Manager
- Alt + RMB (Right Mouse Button) should provide jgmenu on any installed Window Manager
- Super (Win)+ F1 should provide application keybindings on any installed Window Manager
- Super (Win)+ F12 should provide active application listing by workspace on any installed Window Manager
- Conky on the right side of desktops should provide critical keybinding information.
Take your time, explore, tweak, enjoy.
Well once you get things installed, play with them. Discover what you like and what you don’t. You get to keep this stuff no matter what. If you break it, you even get to keep the pieces.
Caveats:
Do I support this toolset… well, not exactly. Will I respond to questions, suggestions, etc.? Well, maybe.
I do hope that once you roll-up your sleeves and dig around a bit, you will find window managers easier to work with and enjoyable to use. Enjoy!
This content is free to use, adapt, and share. Knowledge and information should be open
—please spread them far and wide. ~ All materials licensed: CC BY-ND 4.0
Full disclosure:
All content is based on information from publicly available sources. No classified or speculative information is used.
I do not track or sell any user information or use patterns.
This site uses Machine-Intelligence (aka. AI) to assist in content development and maintenance. See: Ardens AI-Powered Research with a Human Compass
Please keep in mind:
- All of my work comes with absolutely no warranty, expressed or implied. However…
- It will almost certainly work until it breaks,
though I must admit it may never work or be useful—and that would be sad.- If/when it breaks, you can keep all the pieces.
- As for what you don’t like, it’s yours to do with as you will.
- If you find my materials helpful, both you and I will be happy (at least for a while).
- My advice is worth every penny you paid for it!